I am making new video to go with the written version of this pattern. I have worked out a new set-up for my videos, that allow me to see what I a doing while letting you see what I a doing. In other words.. keeping my hands INside the frame! LOL
I will post the new links as soon as I make them. The current ones are below.
Right hand: https://www.youtube.com/watch?v=F5NGFWUDI4A&t=1s
Left hand: https://www.youtube.com/watch?v=nPhvcrUGX6c&t=1s
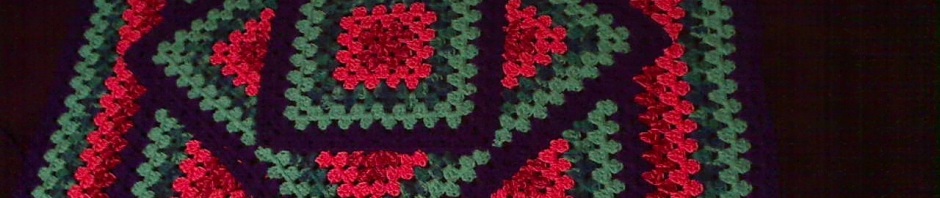
Squared Diamond Granny Throw
I Am replacing both my former instructions and Barb Preslier instructions with what I hope is better written instructions for this pattern.
Up top, are detailed long winded notes. It would be good to read them. Below them is a shorter, row by row pattern for you. I really hope this helps everyone!!!!
I had a couple of questions on a beautiful version of my pattern, asking for the colors used. So I tracked the info down….For the colors used on the Ocean Glow version, by Pink Lemons go here to her ravelry page : https://www.ravelry.com/projects/PinkLemons/squared-diamond-granny-throw
YARN: For a 5 color project, get 5 7oz skeins of yarn. I used Red Heart regular super saver. The outside color will take almost all the 7 0z. The innermost color, will take about 1/2 that. The others fall somewhere in between.
HOOK: I used an “I” Hook. Also known as a #9 and 5.50mm. Having said that, you don’t have to use an “I” hook. You could use a “G” and make 4 panels for a larger bed or make one panel for a crib. You could use a “K” and bulky yarn and make a big floor cover to lay on or play on. Or a “J” and rug yarn for a floor covering. If you are a loose hooker, an “H” size will give you about the same results as mine. Be flexible and don’t angst if you don’t have a ‘right’ hook size.
GRANNY STYLE: For this granny throw, I prefer you to use the standard 3DC clusters, with no chain st between and with a chain 3 on each corner.
You must turn your work on every row, or the inside granny square will look different from the outer corners. Those HAVE to be back and forth unless you want to cut and tie off every row.
The only no variation part of this pattern is the number of rows. They must be even! So grannies of 4, 6, 8, 10, 12, etc are required. And the larger outside squares must also end with an even row.
I used 10 rows of 5 colors with 2 rows of each color. You can use as many or as few colors as you like, with single , double, triple, etc. rows of colors.
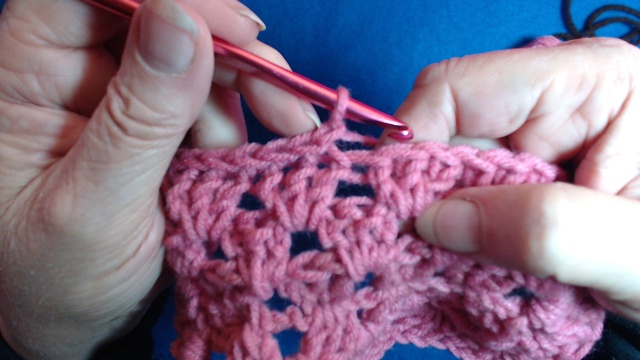
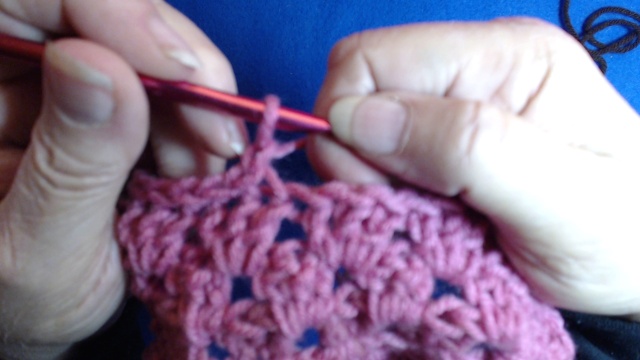
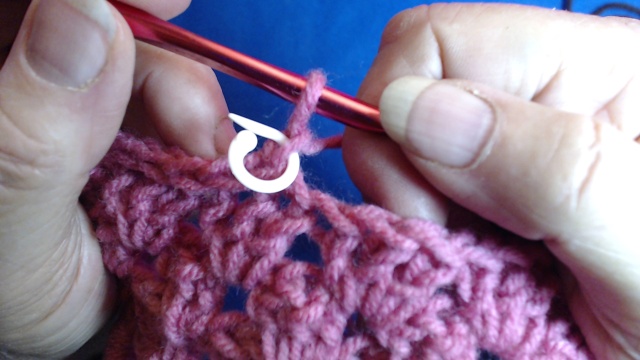
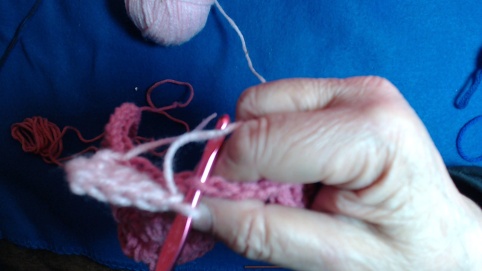
FINISHING A SQUARE – DOUBLE SIDED and SINGLE SIDED: At end of last row, turn to front. Slp st in front loop of every st around including the Ch3’s. (slp st loosely over Ch sts.) Ch 1 in center of each side and mark it or you will lose it. [pictures 1, 2, 3]


COUNTING STITCHES: How many stitches should you have on a side? 3 for each cluster, and 2 extra for the corners when not counting the middle of the ch3 space. So, first side…. I had 10 clusters so 3×10=30 plus 2 for the corners =32 Remember the extra stitch I had you add in the center of the slp st row? That does not count as a stitch. It is considered both the last and first stitch in the center clusters.
STARTING SIDES:
Two sided: Behind the front and back loops of the Slp st row, you will find 2 threads on the edge. One is slightly longer than the second thread back, and the second is a little behind (closer to your hook hand) than the front one. You will use these for every attachment. This will leave a ridge on both the front and back sides of the piece. You will use the back 2 threads of the Ch1 spaces to anchor the corners at each center side.


-
- Center of side
-
- Ch 1
-
- Mark it!


One sided: On the edge, use one center thread and one back loop to attach every row, the two back threads of the center Ch1 will anchor your corner group.
Note: SC’s used at the beginning and end of rows are treated like a Ch1 space. You work around the ‘post’ of the sc like you would a Ch st.
Starting at the center marked Ch st, moving backwards towards the hand holding the hook, SC into the second st from center, (edge of your ‘hook side center cluster’) with your center color. Ch1 and make a corner cluster set in the center marked stitch. (3DC, Ch3, 3DC) Ch1 and sl st to the second st on the other side of center. (outside edge of the cluster on the other side of center.)
Ch 1 and anchor the other side with a slip stitch
Ch3. count to second st out from where you attached the sl st and make a SC. (Sace for next cluster) Turn Work!

Chain 3 and attache to side with a SC.
Row 2: Make 2DC in Ch1 sp. at the base of the ch3. (3DC cluster made).

Put 2 DC into the Ch 1 space below
First 2nd row cluster made
Make a typical corner cluster set in the corner tip. Make 3DC cluster in the original SC made when you started the color.


Now, to end color, SC into the second stitch up, and tie off. Turn Work!


Why am I using SC st to tie on and off spots? …To leave the end on the inside of the color and not at the edge. Easier to hide that way.
Row 3: Back on the front to add your next color… Sl st to second st from last used on that side. (1st st of third cluster, hook side) Ch1, make a 3DC cluster in the SC space at end of last color. Continue granny style through the side and around the corner to the other side. Again at the other side, ch1 sl st to second chain from last attachment, Ch3, and SC in second st out from last sl st. (1st st of third cluster on that side) Turn Work.
Each row and set of colors is handled the same way. Continue on till you reach the corners.
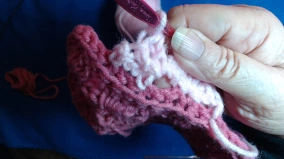
AT THE CORNERS: Your 8th row will be different. when you come up from connecting the end of the 7th row, you chain 3 and do not attach to the side. Turn and using the space in the last row, continue back down for your 8th row, by completing the cluster you started with the chain 3. At the end of the row, do not tie off, and do not attach… pull out a long stitch and loosely tie it. Leave a slightly long tail and cut. Turn work. With the front facing you, move around forward to the next side. At the end of the 8 row , Ch1 and slp st into top of the chain 3 of 8th row of the last side you did, and tie off. Turn work to front again and go forward to the next side. Repeat for each side. At the end, use the long tail of the first section to ch1 and slp st to the last side.
The 9th row, will have the center cluster over the corners, and bury the Ch1 space (like you do if you are hiding a tail) and connect the cluster on the corner stitch into the lower color. You will not stitch around it like on the regular granny corners. Go behind the front loop and use two middle ones. This leaves the stitch ridges showing on the inner diamond, so it looks like the inner is sitting on the outer. What color you end your outer square is up to you, but it looks better if you end it with the same color as the inner square.
For each ongoing layer of outer squares, you treat them just like the first. Make your sl st row using the front loops only and make your side connections on these inner loops of the sl st row.
As the squares grow, no 2 side configurations will be alike. You will be using more sets of color bands on each layer, after the first one, or using more rows of each color if you choose. You can use one or two more rows on the outside to finalize the throw. It is all up to you.
Be flexible and have fun with this. Fudge a couple stitches if you have to to make it work out right. Crochet is very forgiving and will not show such adjustments easily.
Happy hooking guys!
Line by Line:
Begin: Make magic circle,
Row 1 – Ch 3, in Magic Circle… 2DC, *Ch3, 3DC* 3x’s. Ch2, Close Magic Circle. SC to top of Ch3. Chain 3 and turn. (turn every row on inner granny!)
Row 2 – 2DC in Ch2 sp, *3DC, Ch3, 3DC* in next Ch3 space, repeat *-* 2x’s. 3DC around post of SC, Ch3 Slp st to top of Ch3. Tie off. Turn.
Row 3 – Change color, Slp st in any side space and Ch3, 2DC in same sp, *3DC, Ch3, 3DC in next corner*. 3DC in next gap, 3DC Ch3 3DC in next corner, Repeat around to first cluster. Slp st to top of Ch3. Ch3 and turn.
Row 4 – 2DC in same gap, 3DC in each gap, 3DC, Ch3, 3DC 3Dc in each Corner cluster Ch3 sp. Slp st to top of first Ch3. Tie off.
Row 5 – Change color, Slp st in any middle gap. Ch3, 2DC in same gap. 3DC in every gap, Corner cluster [3DC, Ch3, 3DC] in every Ch3 corner. Slp st to top of first Ch3 in first cluster, Ch3 and turn.
Row 6 – 2DC in same gap. 3DC in each gap, Corner cluster in each Ch3 corner, Slp st to top of first Ch3 and tie off. Turn.
Row 7 – Change color. Slp st in any middle gap, Ch3, 2DC in same gap. 3DC in each gap and Corner cluster in each corner around. Slp st in top of first Ch3, Ch3 and turn.
Row 8 to 10 – repeat rows 6, 7. Do not turn at end of row 10!
Outside of square – With Slp st on hook, front of the last row is facing you. Slp St in front loop of each DC and loosely in each Chain. > Ch1 in center of each side. >Mark Ch1. Slp st to first Slp st and tie off. >See pictures in long notes above.
This is the end of the inner Granny square.
Notes:
All row connections:
2 Sided connections are on center 2 threads on edge. See long note above.
1 Sided connections Are on center thread behind the Slp st’s and the back loop.
All outer Sections:
All even rows start and end in SC,
All odd rows, start and end with Ch1.
Row 8 does not connect to inner square.
First side:
Row 1 – Looking at it from the center out.. Slp st in 3rd DC of first center cluster, and Ch1. In marked Ch1 sp, *3DC, Ch3, 3DC*(** Corner set) . Ch1, Slp st to 3rd, DC of cluster on other side of center.
Row 2 – Ch3, SC to middle DC of next cluster out. Turn work. 2DC in Ch1 sp. Corner set in corner Ch3 sp., 3DC in Ch1 sp. SC to middle of next cluster. Tie off. Turn work. See pictures above.
Row 3 – Change color. Slp st to 1st DC of next cluster out, Ch1, 3DC in SC, 3DC in next gap, Corner set, 3DC in next gap, 3DC in SC, Ch1, Slp st to 1st DC of next cluster.
Row 4 – Ch3, SC to last DC of same cluster. Turn work. 2DC in Ch1 sp., 3DC in next 2 gaps, corner set, #dc in next 2 gaps, 3DC in Ch1 sp. SC to last DC of same cluster. Tie off. Turn work.
Row 5 – Change color. Slp st to middle DC of next cluster. Ch1, 3DC in SC, 3DC in each gap, Corner set, 3DC in each gap, 3DC in SC, Ch1, Slp st to middle DC of next cluster.
Row 6 – Ch3, SC to 1st DC of next cluster. Turn work. 2DC in Ch1 sp., 3DC in next 2 gaps, corner set, #dc in next 2 gaps, 3DC in Ch1 sp. SC to first DC of next cluster. Tie off. Turn work.
Row 7 – Change color. Tie onto last DC on side. Ch1, 3DC in SC, 3DC in each gap., corner set, 3DC in each gap, 3DC in SC. Ch1, slp st to last DC of side, Ch3 and TURN
Row 8 – 2DC in Ch1 sp, 3DC in each gap, corner set, 3DC I each gap, 3DC in Ch1 sp. Pull out long loop or secure with a marker. Leave 4-5” tail. Cut. Turn
End of first side section
2nd – 4th sections:
You have the front facing you. Back up to the next side behind your hook hand (right for right handed, left for left handed)
Same as first, but at end of row 8, you will Ch1 and slp st to 3rd ch of row 8 on last section made.
Now undo long loop on first section row 8 and Ch1 and slp st to top of Ch3 of 4th section , Row 8. Turn work so back of row 8 faces you.
Row 9 – Tie onto any gap before inner square corner and Ch3. 2 more DC in gap, 3DC over Ch1 of Row 8 and through back 2 threads of Ch3 corner of inner square. 3DC in each gap around. Corner clusters in each corner Ch3. Repeat to beginning, Slp st in 3rd Ch of first DC.
Row 10 – Ch3 and turn. 2DC in same gap, 3DC in each gap and corner sets in each corner to end. Slp st into top of Ch3. do not turn.
Slip stitch row – slp st into front loops of each DC and Ch st. Add extra Ch1 at center of each side and mark it. Slp st into first Slp st. Tie off.
End of second Square.
The next layer, will not end with the last color at the tips of the square you just completed. But the rows are treated just the same.
The Third Square:
Rows 1-12 – Do the same as rows 1- 6 on last outside corner sets.
You will end tied off rows at Row 12. You will be on your second run, through the color changes. So row 12 will be the end of your 1st color of the second go round. It will begin and end on the middle DC of the ‘second to the last cluster’ on each side.
This is the end of separate sides.
Row 13: Start a couple clusters back. Add 2nd color with a slip st and Ch 3 and work up to the inner corner. @Ch 1, Slp St into the last cluster on inner corner. (EXTRA STEP: Turn work over so you can see the back of the slip stitch, Slp St into the “leg” of the slip st), Ch 2 Ch 1, Slp st into the 1st DC of the last cluster on inner corner, Do EXTRA STEP, Ch 1, 3DC in SC gap.@ [Repeat @to@ at each inner corner.] Cluster in each cluster around and corner set in each corner. Ch 1 and Slp St into top of Ch 3. Chain 3 and turn.
Row 14 – 3DC in each gap, Corner set in each corner , 3DC in Ch 1 sp before inner corner,
skip Ch 2 sp. Ch1, 3DC in next Ch 1 sp, and continue on around to beginning. Ch1 and slp st into 3rd Ch on Ch3. Tie off.
Rows 15 to 20 – Just 3 Color changes to go! Add 3rd color anywhere, and finish last 6 rows same as rows 7 -10 in inner granny square.
Outside Edge:
We are going to finish with a Barred Single crochet. This is one of my own stitches that makes a really nice two sided edge. We just went through a lot of effort to make this a two sided project, no need to have a one sided edge to top it off…. is there?
After your slip stitch, at end of row 20, Ch 1. and turn. You need the back side for this edge.
Barred SC: *Use the side of your hook to drag the feed yarn forward, and go into the top of the next DC . Exaggerate your hooks entry into the stitch by bending the handle all the way down in front. This will force the feed yarn out where you can catch it on the edge of the stitch with your thumb. Grab this, YO, and draw your loop through like normal, let go of the feed line with your thumb, then YO and complete your SC.* So, *to* is… Drag, go in next stitch, bend hook, grab feed, pull loop through, release feed line, YO pull through 2 loops. [See end of video.]
Slip stitch to Ch 1 and tie off.
Congratulations!! You Did it!!!

Pingback: New project | messedupinthehead
Thank you! So excited to see the written version of this! I have the yarn, just have to find the time now!
I know how hard it is to find some time for crocheting & if I sit thru the day & crochet I feel guilty I am not doing other things that need doing, oh well,I have a large stash so yarn isn’t the problem
My email address is yarngranny68@gmail.com I would like to know the colors that you used , I really love the way they look
Sandy, I am sorry to say I don’t remember the names. I used Red Heart Super Saver 7 0z skeins and the 5 oz are in the same color selection page only are 5 oz . I do know the blue was royal or royalty. I bought them off of Joan’s site and right now they don’t have that type listed. When they get more in, I will be able to look up the colors for you. I think the pink was Pretty in pink but I am not sure. So sorry.
And the purple is Amethyst. Found some still in the jacket.;-)
It would be nice to see a photo of the throw. I checked the YouTube channel and there’s only a corner showing. It would be nice to see the entire throw to determine if I want to make this throw
There is a bare edge that is missing from the picture on the post: https://wordpress.com/read/blogs/20804914/posts/130 Hope this helps.
Thank you – I do not understand the pattern yet, but i will keep trying! Also, your YouTube link doesn’t work. Takes me to a 404 error.
-Thank you for finding that out. I re added the link and added both right and left hand ones this time. If it still doesn’t work, then go to Crafty Chrystal in YouTube. All my videos are there.
I’ve been crocheting for nearly 40 years, the granny square was the first thing I learned to make. 🙂 But this is going to take practice. So lovely! I will wait till after the holidays so I have time to master this work of beauty. Good show!
this is a wonderful looking pattern…..can’t wait to try it……I have to say though, I was reading above but had to stop when I got to “loose hooker”….sorry….laughed so hard I scared my cat…
Oh! HaHa… You gave me a chuckle too1 I didn’t even realize… Thanks for pointing that out.
And for those reading… I didn’t mean any double innuendos with that! LOL!
I love this pattern. Still trying to figure it out. Only using 4 colors
Try using 2 rows for center, then 3 rows of next color, then 2 rows and follow up with 3. Ten rows total. Or just go for 8 rows of 2 each and more levels. All you need is an even number of rows.
Is there any way you can make a tutorial showing us exactly how to make the triangles…I’m new at reading patterns but good at watching tutorials
Look for the link at the top for a video to follow, and I will be (am in the process of) making another one.
How do you do the triangles, I’m starting got my granny square but I’m lost on how to do the triangle part, I have watched the tutorials but they don’t show how to do the triangles
Read from “Starting Sides”. Tells you where to start and how to do each step.
I will also be making a second video that will make it clearer.
How about a diagram for your beautiful pattern or maybe just a basic written pattern for us sticklers
R1..R2…etc…????
Hi Sparkle! I had hoped the written pattern I did was clear enough. What did I do wrong, that needs clarification? I would hope that between the video and the written I had covered all bases. Let me know what is giving you trouble and I will try to help.
Hi, love your pattern, but I followed and my squares are curling up. Please if you have a diagram to share?
Patriciachavez050 @Gmail.com
When I click the top link, the final video for right handed version, it says that that video does not exist.
Sorry… fixed it! ;-D
Thank you!
Your pattern is lovely. I have not yet read through it, but I will. This will go on the “to do” list, certainly. I am also one of those who, back in the late 1970s, learned how to crochet with a granny square. The way I was taught was to turn after each round, and that is my preferred method, though I know there are so many methods. I still have a love for granny squares – I guess it just stuck with me.
Thank you Donna! And don’t we all have a granny square or three in our crochet history? AND a “to do” list! Oh boy, mine will never be complete… unless I live a good many more years and add no more to it.Lol!!!
Reblogged this on adornosmalulu.
I do not understand the problem when you get to the side is kinda complicated for me to do I would like lil bit more reasonable because the way you doing it is hard for people toCan you write the pattern down for us to see how to be done because right now it is hard to understand the way they do it on the side
Hun, take a look at the video:
at 15:58 I show how to add the slip stitch to the edged of a square. From there I show yo how to add the sides.
If using the slip stitch is too hard for you, why don’t you make the throw one sided and just crochet through the back loops of the edge? This will give you a ridge only on the front side, but it might be easier for you.
The written instructions are on here at “Starting the sides”
I am sorry this is so hard for you!!!
thanks for all of this. and please bear with me but i could not find “Starting the Sides to find the written instructions. can you help me please?
STARTING SIDES:
Is right after: FINISHING A SQUARE:
EXCEPTION: and COUNTING STITCHES:
Decided the problem was very hard for people to understand how to do it
I really love the look of this blanket it’s beautiful. But with that being said I find your instructions written and in the video extremely confusing and I’m not able to complete the project. Very disappointing.
Just finished this and while I can see the ‘learning opportunities’ that I didn’t frog, I know my brother will be happy with it and the optical illusion of squares piled on each other. It was good fun to do. Thanks.
it is so beautiful! could you please provide us with the actual instructions? thank you so very much.
Bless
Mmmmm, I don’t know what to say, actually. These ARE the written instructions. ???
What they mean by written instructions is going by rows. Row 1. You explain how to start…Row 2. You explain how the second row,goes ,Row 3- and so forth, how you have it written above is kinda confusing to ppl who read to crochet by Rows….
Sorry snooky, I had so many people with questions, the purpose of the written was to expand regular un-explained instructions to something that had more info on each part of the pattern. It shouldn’t be hard to make a short version for yourself. Just copy and paste to notepad and delete all the extras. But a strict line by line wasn’t my goal here. Sorry it hasn’t helped you, really am.
g m Chrystal – it is just that your work is exceptionally beautiful. i think we (ok… i) am so used to step by step instructions.. when i have completed by current 2 projects I aim to try this one out.
wish me luck
Oh Brenda I do wish you luck with it! And you can ask me any question if you get stuck and I will answer in whatever detail is needed to explain it. And thank you for the compliment ver much. You made my day!
I think This is going to be a priority when I get the one I am working on finished,hopefully I can get the gist of it all
Anyone volunteer to do this wonderful pattern row by row? Thank you Chrystal. I think this is a genius piece of innovation.
Thank you Jane!
I have been working on writing this out row by row. I’m almost done. I’m glad to share it with anyone. I’m sure there are problems in my rows that chrystalkay may want to correct. But I made one now and it looks pretty good. It’s a very forgiving pattern.
I would love your row by row directions. I read through this pattern and am hoping once I actually start on it, the instructions will make sense. I would prefer your row by row though. Thank you so much.
Karen, Barb Preslier made a row by row and I added it under my own instructions. I hope it helps you. Perhaps by using both the written and the video, you will find everything you need to make this. Thanks you for visiting!
I’m working on doing a row by row. I have most of it done. I’m willing to share if anyone wants to try it and can make changes until we get it perfect. chrystalkay can check it out too for accuracy.
I’m almost done typing a row by row. I’m willing to share if anyone wants to try it and can make changes until we get it perfect. chrystalkay can check it out too for accuracy.
I would love to see it and would welcome the opportunity to put a link on the video to your addition!!!
AND here too of course!!!
i love this pattern and would dearly love to see the row by row instructions! thank you so much
HI Barbara” i just realized you are the one with the written pattern. you are briliant! would you share this with me please? and thank you – it is such a cool design.
I’d love to share it but I can’t figure out how. If I have an email address I can invite you to get it from my box account.
You can copy and paste it either on the comments here or the video comments. I will copy it here in the instructions with your info on who wrote the directions and any info you want to show them inc. how to contact you. They can ask you questions on the reply spot in the comments too if you prefer.
Would love to row by row instructions. Just finished 3rd set of triangles and am lost.
I need to put the written instructions on the site. Do I send it directly to you or should I upload the document to my box account and share it with you?
You can do it that way, if you prefer, or just past it here in the comments. I will add it to the instructions with your name on it. Or if you have a blog somewhere to post it on,I can put the news that you have a line by line written and give your url. However you want to share it, i will go along. I think it will be a great help to those that need the line by line. You will their hero!
For the instructions that I have written out:
Try this link to my drop box. I tried to copy and paste but it looses the color font I have in it.
https://www.dropbox.com/s/ba4rr00fkuq8ip0/Squared%20Diamond%20Granny%20Throw%20written%20instructions.docx?dl=0
Please let me know what you think. And we can make changes as errors are found. I can take some photos of some of the most difficult steps.
Let’s hook together!
Okay, I have tried in various ways to copy the text from the drop box… no dice. It will take some time to copy it as is so I can work with it. I will have to check it carefully and that might take some time, so I am looking at this weekend to get it done.
You did a LOT of work here and I really appreciate it!
Thank you sooo much!
Hello: If I am not misstaking did you post photos to accompany your written instructions I thought I saw them on line but I could not find anymore.
Thank you
Sorry Angela, I only have my video.
Squared Diamond Granny Throw – written pattern
Pattern by chrystalkay
Written instructions by Barb Preslier
YARN:
Approximately 5 skeins of 7 oz for 5 colors (adjust as needed for fewer colors used)
ROWS:
Ex: 10 rows of 5 colors with 2 rows of each color for these instructions
You can use as many or as few colors as you like, with single , double, triple, etc. rows of colors.
The only no variation part of this pattern is the number of rows. They must be even. So granny squares of 8, 10, 12, etc are acceptable. And the larger outside squares must also end with an even row.
HOOK:
“I” hook used here but any hook you choose for the desired size of your project
GRANNY SQUARE:
Note: You can use any granny square
Granny: Round 1
Step 1. Ch3, DC in first chain space twice.
Step 2. Ch2, DC in same chain space as step 1, Ch3 and repeat 2X
sl st.
Round 2:
Step 1. Ch3, 2DC
Step 2. 3 DC, Ch3, 3DC. Repeat 3 times. Sl st.
(This counts for 1 row of the project.)
Continue to do as many rows as you want with as many colors as you want as long as you end with an even number of rows. This makes your center square.
When Granny Square is done, add a slip stitch row around. You will need to add an “extra” slip stitch on each row.
Directions for slip stitch row:
With the front side facing you, mark the center space of every row. Start at the first DC of a side and mark this spot also.
Slip stitch into the front loops only of each DC and chain st.
When you get to the center space, make an extra chain st in the center ( between the 2 center clusters) of each side.
I made the extra chain before the sl st in the exact center since when I made it after the whole triangle seemed off center. Place a marker on the extra stitch.
Marking the center spot will make it easier to know where your extra slip st goes, and where your connection is when it comes to counting stitches for that side. Make sure your sl st are not tight.
COUNTING STITCHES:
It is critical to count your stitches on each row. This will vary depending on the size of your granny square.
Ex: For the 10 rows of 5 color granny square:
3 for each cluster and 2 extra for the corners (do not count the middle of the Ch3 space.)
So, per side: 10 clusters. 3 stitches × 10 clusters = 30 stitches plus 1 for each corner (there are 2 corners) plus the extra stitch.
30 + 2 + 1 = 33
STARTING THE SIDES:
You will be using the innermost loops. You will grab 2 strands of the sl st from the backside.
This will leave a ridge on both the front and back sides of the piece.
Find the “extra” stitch you marked in the center – the center stitch.
Fourth Third Second First
__4__ _____ __3___ __5___ __2___ __6__ __1___ _____ __7__
L4 L3 L2 L1 Center Stitch R1 R2 R3 R4
1. Front side facing. Starting at the center marked square, go 2 and 4 stitches to the right (R2 and R4) and 2 and 4 stitches to the left (L2 and L4). Mark these. Starting at the center marked sl st, count over to the right of center and into the second st from center. Slip stitch (1) (grab 2 strands from backside), with your center color. Ch1 and make a corner cluster set in the center marked stitch (2) (go thru 2 front loops on this). (3DC Ch3 3DC) Ch1 and sl st to the second st on the other side of center (3) (the left side of center). Ch3. Count to second st out from where you attached the sl st and make a SC (4) (this will be first stitch of next cluster). The pattern should be symmetrical. Turn work!
2. Back side facing. Make 2DC (in the gap space to the left of the cluster – not the left of the Ch3 space – (5) in the ch1 space next to the base of the Ch3. (3DC cluster made). Make a typical corner cluster set in the corner tip (no number for this step. Just go into the large gap at the top of the center). Make 3DC cluster in the original Ch1 space (6) (gap space on the other side) made when you started the color. Now, to end color, you can use a Ch1 and sl st to the second stitch from the last used (7) and tie off there. (You can anchor the stitch by entering to the front loop from the back). Turn Work!
3. Front side facing. Starting at the end of each anchor, go 2 and 4 stitches to the right and 2 and 4 to the left. Mark these. Back on the front to add your next color… Sl st to second st from last used on that side. Ch1, make a 3DC cluster in that Ch1 space. continue granny style through the side and around the corner to the other side. Again at the other side, Ch1 sl st to second chain from last attachment, Ch3, and sc in second st out from last sl st. Turn Work!
Each row and set of colors is handled the same way. Continue on with rows 1-6 until you get within 5 stitches of the corners. You will stop at row 7 in this example.
Do the other 3 sides.
Tip: When you are on the last row (here row 8), you will have 3 stitches left – 2 sl st and a corner. You need to skip one sl st (either the first or second). The corner will be your end. You will not include the corner yet, but it will be the official end spot.
Note: In dealing with the center stitch of each corner when you get to it, if you want to sl st around the corner you can so you can continue on the next section. Do not include the center stitch. Then you will start the next row as in the instructions and away from the corner. Otherwise, tie off the 7th row and start the 8th row as in instructions and away from the corner. The 8th row will be one complete round of the piece.
AT THE CORNERS: In this example, when you get to the corners, the 7th and 8th row will be different. This is the 7th and 8th row of the side. Leave a long tail at the beginning of the 7th row only on the first side you do. When you come up from connecting the end of the 7th row, you chain 3 and do not attach to the side (4). Turn and continue back up and down for your 8th row. Turn work. With the front facing you, if you are right handed, you will go to the next side to the left. This will make this 8th row end at the free floating 3 chain from the last side. Chain 1 and slip stitch into the top stitch of the free floating 3 ch stitch and tie off. Repeat for each side. At the end, use the long tail of the first section to chain 1 and slip stitch to the last side.
You will NOT have this last row attached to the corner yet. This will come in the next row (row).
The 9th row will have the center cluster over the corners. Connect the cluster on the corner stitch and into the lower color. Be sure to leave the stitch ridges showing on the inner diamond, so it looks like the inner is sitting on the outer. What color you end your outer square is up to you, but it looks better if you end it with the same color as you ended in the original granny square.
Treat all other squares just like the first. Make your sl st row using the front loops only and make your side connections on these inner loops of the sl st row.
As the squares grow, no 2 side configurations will be alike. You will be using more sets of color bands on each layer or using more rows of each color. You can use one or two more rows on the outside to finalize the throw. If you do, make a row, sl st to the top of the Ch 3 space to finish the row, turn your work, and make the next row going in the other direction.
“Step 1. Ch3, DC in first chain space twice.
Step 2. Ch2, DC in same chain space as step 1, Ch3 and repeat 2X”
This makes no sense. The first instruction (place a slip knot on the hook) is missing. Then if I follow these instructions as written, I get the following:
Chain 3, place 2 DC into the first chain. Chain 2, make one DC into the same chain space, then chain 3, then chain 2, then make one DC into same chain space, then chain 3, then chain 2, then make one DC into the same chain space, then chain 3.
I end up with a strange lopsided wagonwheel.
That was Barbara’s method. I prefer to use a magic circle, but the idea is, to make a granny square. There are several ways to do that. I think she meant to make the whole start of the granny square in the first chain, but it should have been a chain 4 so the last 3 chains would equal the first double crochet. Just start the square with whatever method you like best or check out my last video on the subject. At the beginning I show you how I start one, https://youtu.be/xTy3m9-PzEY?list=PLHC72TfuEIZHOZB-mBUMW7CBo5Nsnzz1K I hope the video will help you over any of the rough spots.
some of the lines got messed up – like the chart
Pingback: Diamond Granny Crochet Throw | Styles Idea
Thank you so much for sharing this beautiful pattern.
I only have two questions.
Are you turning after every row, even on the granny square?
And has anyone used the pattern to make a bigger version? As in one whole blanket and not putting multiples together?
I hope that all made sense
Yvonne
Yvonne, You don’t have to turn for the first inside granny part, but since you need to turn for the corners, it just makes the inside match the look of the outside. You can see the difference, but it is totally up to you.
As for going really big, i don’t know just how big your are talking. You should be able to get to a Calif King size, those are supposed to be as long as they are wide. And that works out fine. Some change or add onto the edges with other squares or color bands etc. Whatever you decide to do, it will be okay. This is your creation!!!
Love your blanket, have made three for family members and working on a fourth. For anyone who is having trouble with the written patten, I watched the second video, it made it easier for me. Again thank you so much for this design.
Pingback: Diamond Granny Squared Throw | Styles Idea
I made a blanket for my adult son using one of your “squared diamond” patterns with camo colors and he really loves it!! Thank you so much! I’m trying something new with one for my daughter. I’d like to had the smaller squares in each corner of the blanket but I can’t start them correctly. I’m bad at reading patterns but videos have taught me to crochet. Can you tell me where the pattern starts on the small squares? Is there a video with those? Thank you again!! Merry Christmas!!
Someone else came up with the squares on the corners and I only saw the picture they shared. If I was going to try it, I would anchor 2 stitches up from the corner middle chain and use the corner middle chain as the new center for the square. I would do the attachments the same as for the corners of the main piece, but make 2 doubles, chain 3, cluster(3DC), chain 3, cluster, chain 3, 2DC. Attach to the side of the square 2 stitches up from the center you have been using with a slp st. Slp st over to the corner chain and into the chain space, then chain 2, attach with a sc to side then 2 more DC into the corner space and chain 3 and another cluster and continue on around in granny fashion, attach to side 2 stitches up with a sc. Chain 2 attach 2 sp up with a slp stitch and DC in the SC space below. continue on as usual. The differences as I see it will be the alternate use of the 2 DC or ch2 plus 1DC on the edges where a normal cluster would be in a square, these 2 st row ends would attache with a slip stitch because you don’t put any stitches there on the neat row. on alternate rows, you need to attache with a SC so you have an anchor to fit the 2 stitches in the next row up. Saying it another way… whole cluster ends on one row followed by a 2 stitch cluster on alternate rows. Oh and no ch1 between side clusters and your square builds. Whew! That is how I would do it and you can try that and see what it does for you. Thank you for the complement to my pattern! I really appreciate it!
You are truly exceptionally talented and even more of a good person.
Thank you Chrystal.
Brenda
Wow! Thank you so much for the compliment! I don’t know what I did to deserve it but I really appreciate it!
Hi dear crochet person! I just bought my yarn to work on the pattern that you have so gracefully shown all of us how to make. I’ll keep you posted 🙂
And thank you again
Brenda
Wonderful! I will be looking for the updates!
Do you happen to remember which colors you used for the blanket featured on Ravelry.com? Not the one with the red center but the one with the mint center? I LOVE the colors.
Actually it is a color problem with the camera. I used a light blue there and it looks green. If you can actually go to a yarn store, you can spot easily the colors that will look great together. I like to use the darkest on the outside to really let the graphic on top look pop. I use either my lightest color for the middle or a darker variegated related to the lightest color. Sorry I can’t help you more with this question.
I put together colors that I liked. No variegated this time because the color I wanted was sold out. I went with all Red Heart Super Saver in Minty, Jade, Real Teal, Soft Navy and Dark Orchid. 🙂
Oh it sounds wonderful! Please let me now how you are doing with it.
what are the measurements (how big will it be)? thanks 🙂
On the average (meaning, are you a loose crocheter or a tight one) it will be between 36 and 40 inches square.
How,do you increase the size? I would like to make a 60,x 60, or something close to that. I think it is beautiful. Thank you for sharing your designs.
Others have made it bigger by adding another layer of corners.
Across the corners it will be about 27 to 30″ So that would be the side dimension with one more outer corner layer. And you could expand that with a good border if it lacks an inch or two. I would rather make 4 of this size with 2 complementing sets of colors or do one set of colors but with opposite inner colors. ei, dark to light and light to dark. I am glad you like it. Whatever you do It will be great!
Love the look of this.
What are the colors of the yarn used
Thank you it is beautiful
I have been doing granny squares for years and found this pattern and was really excited! I found the written instructions really confusing and the video was totally different?? You never stated in the written pattern to turn and who make a first round INTO the stitches??? That was really confusing. That magic ring is even worse I have used it numerous times and everything came apart at the end.
The pattern is beautiful. I still trying to work it out.
Hun, the first round described in the directions is the 11th round. The slip stitch round after the ten rows of granny square. The corners are added onto the sluip stitch row so the inside granny square stands out. Go back and re- read the beginning, before the directions start. It tells you where I am beginning the directions. Also, in the video, the last one, I mentioned that the inside square should be made with rows going in both directions, so the center would look like the corners. There is a distinct visual difference in going all one way and going front and back. I am sorry you are having trouble.
For a very slow and clear way to do the double magic circle check this out. I did it twice explaining it as I went. Personally I could never get the single magic circles to work without disintegrating. With the double i have no problem at all and can cut it as soon as I finish the center. give it a try…
Crystal, I love your colors and pattern used in this video. Thank you for taking time to mull over your ideas on camera. It helps a newbie like me to realize just some of the possibilities this pattern offers.
Be blessed.
PS: Enjoyed seeing your fur baby!
I’ve been looking for a diamond square pattern since I tried one before and the instructions had so many mistakes I had to ditch it. I’m looking forward to trying out your pattern. I am a yarn hoarder so I have plenty of yarn to practice this on. Thanks for sharing your beautiful pattern. 🙂
Could you please add pictures of finished pattern so we know what we’re making. Thanks!
WoW ! I’m hmmmmmm.
Pingback: Kaleidoscope Crochet Granny Blanket | My Hobby
Pingback: Ocean Glow Granny Throw [Free Crochet Pattern] | My Hobby
Pingback: Kaleidoscope Granny Square – Free Crochet Pattern | My Hobby
Your pattern isn’t written properly. The instructions are hard to follow when you’re crocheting at the same. You didn’t put 3DC in spaces, other that the corners. You receive one star
Hi Jade! I am confused I guess, I read and re-read the Line by Line section and can’t find a place where I am missing the 3DC. Which line is it? I will change it right away. Thank you !
a – one star? not nice. I think another star c/b given for effort; and another one for sharing and yet one more for quickly responding.
Thank you Brenda, i will take those extra stars humbly, but i still need to know where i messed up. I can’t improve if i don’t know how.
Pingback: Kaleidoscope Crochet Granny Blanket Free Pattern | EASYWOOL
I love this pattern and your colors!!!! I’m just curious how many rows of each color per row you did on both the blue and red blankets. I’m just trying to make the same ones! Absolutely love them and want to make very similar!!!! Thank you for sharing!!!
Hi Leanna, I did 2 rows of each color, 5 colors , and repeat. i hope you do make this, i would love to see it!
Thank you for this but I want a drawing pattern if you can 🌼🌼🌼
I am about to start this!! I’m trying to talk my sister into starting one, too.
Wonderful JJ! I hope you can persuade her. It would be fun and mutually supportive too.
Hi Chrystal, thank you for sharing your time and design. I am anxious to start this project on Sunday. I have one question though. I want my center granny to be diagonal but I am unsure how to get it to that with the way I add the 2nd set . I hope you can understand what I am asking…can you help me.
I hope I am answering this so you can understand it. There is no difference in the actual shape of the square, just its orientation to the outside layer.
Annette, the second square will automatically make the center diagonal look, like a diamond instead of a square, the third outside set will make it look squared off again and the fourth will make it look like a diamond etc. I usually make 2 outside layers but lay the throw diagonally on my pillow so it looks like a diamond. If you want to make a bed cover, just make 3 outside layers and then add ends or put 2 together to make it long enough. Hope this helps!
Pingback: Squared Diamond Crochet Granny Throw | Pattern Center
What were the colors you used to make the ocean granny kelidascope blanket. I really want to make it using them.
I tracked down the site that has her colors listed…. here: https://www.ravelry.com/projects/PinkLemons/squared-diamond-granny-throw
Pingback: Squared Diamond Granny - Love Quilting Online
Pingback: Squared Diamond Granny Throw
Pingback: Kaleidoscope Crochet Grandma Blanket Free Pattern | DIY chrystalkay.wordp ... - Easy Yarn Crafts
Pingback: [Video Tutorial] Amazing 3 Levels Squared Diamond Granny Throw - Knit And Crochet Daily
Pingback: Kaleidoscope Granny Throw Best Ideas | Your Crochet
Hello, my question is to make a queen size bedspread, is it 5 skeins of each color needed?
Okay, Janet, You will need 2 1# skeins of the outside color, 1 1# and one 7oz skein of the next color in, 4 5oz skeins variegated for the outside variegated ring. 1# or 2 7oz skeins for the second inside ring, and 3 5oz skeins for the center variegated. That is for 4 throws connected together. I have no idea exactly what you would need for a single large one. Your guess of 5 skeins each might be right on. Just make sure you choose colors you will want to use on other things in case you are left with a lot of one or two colors. Also, Red Heart are no dye lots which means you can go but more if you need to without the colors being off. If you do not use red heart, than make sure any brand you get is a “no dye lots” type. Good luck!
Pingback: Block 31 Water Lily Square Crochet Free | Pattern Center
Hello,
I just saw the a picture of your blue and gray or beige(?) and white queen size bedspread. I love it!!! I want to make this one as is. It looks like there are 5 colors and there are 5 squares each with increasing amounts of rows for each color. I cannot figure out how many rows you did for each square and color. Can you please give me the colors you used and how many rows of each color per square. Thanks !!!
Dear Lilian, I am glad you like my pattern, I spent a lot of time getting it right and it feels good to know someone appreciates it. However, the site that sent you to me is the one that made the queen sized throw, Mine is 3 levels and about 40″ square. I think if you look it up under ‘Kaleidoscope Granny Throw’ on you tube, you might find the maker. Other wise, you will need to count the rows as best you can and pick colors that go together and approximate those you saw. If you ever need to examine a pattern up close and personal, save the picture and use a picture program to expand it until you can see how it is made, count stitches or rows etc. Good luck!
Thank you for getting back to me so quickly. The site I found this on refers me to your pattern. I’m sorry it is not yours but I will try the video site you refer me to and try to figure it out. Do you know if the alternate site is using your pattern?
They use my pattern, but adapt it to their own uses. I expect to see one made into a shrug one day. It would be dynamite. I also suggested using thicker yarn and making it into a rug. I am glad they refer back to me, but it is not fair to not show their own input and the way their changes were made. I wish you luck in finding what you need. You could try potting a comment on one of their videos and telling them I approve of them doing their own pattern adaptations publicly so you and others can use them too.
Pingback: Squared Diamond Granny – Global Crochet
Pingback: Squared Diamond Granny Throw – Craft Ideas
Pingback: Kaleidoskop häkeln Oma Decke Free Pattern | DIY chrystalkay.wordp … – stricken damen
Hi again
I am in the process of making this pattern and am on the 3rd set of triangles. however with the second set completed, the piece doesn’t lie flat rather it bunches up at the corners where the triangles are joined and I don’t know why. I did not do the row of slip stitches, but that shouldn’t matter. Can you help?
Hi Lillian, I want to answer your question, and i am at a loss as to how to answer when I can’t see it. So instead let’s start with some questions. Are there 8 rows from the center of the side to the corner? That means 8 clusters from each smaller square point to the new points of the corners. Are there 32 stitches on the small square side not counting the very corner chain? Not adding the slip stitch row should not be a problem, as long as you allowed for the extra center stitch to hold the center clusters. Look back and forth from your added corners to mine and see if there is anything that pops out at you, from spaces between connections, to top of 8th row in relation to the corner. It might be that you accidentally picked up a smaller hook than you used for the inside, or you could be tense and making the stitches tighter. Tell me what you have checked and we will go from there.
Hi again. Thank you for getting back to me so quickly.!! Yes the row counts are correct. I am using an I hook. however I do tend to crochet tightly. It laid flat before I connected the triangles. I am thinking that perhaps the problem is at the joining of the 2 triangles and I should add an additional chain to the joining plus do a treble instead of a double crochet to join the border row to the point. I have completed 11/2 3rd triangles and they are laying flat. I a thinking to rip them and the previous border 2 rounds back to the join and add the extra chain. what do you think?
It sounds like you have the problem solved! Of course you won’t know for sure until you try it, but the crocheting creator (you) is usually the one that can figure out what is happening. It is sort of a ‘hands-on’ type problem. I have had many problems that pop up, even the second or third time i make an item. (And yes, I did accidentally grab the wrong hook one time and did 4 rounds on a BIG project before i caught on.) Sometimes frogging is just part of the project no matter what you do. It is not rocket science, but I usually feel pretty good about conquering a problem. Every project is a learning opportunity…. Welcome back to school! LOL
Pingback: 20 Ocean Glow Granny Throw Free Crochet Pattern And Video Tutorial - TheYarnAddicts
Pingback: Squared Diamond Granny Throw & written pattern - Jessica's Pins!
Pingback: Squared Diamond Granny Throw & schriftliches Muster - Schöne Ideen zu Hobbys
Pingback: Kaleidoskop häkeln Oma Decke kostenlose Muster | DIY chrystalkay.wordp ... » Stricken ideen
Pingback: Squared Diamond Granny Throw & schriftliches Muster – strickenanleitungen
Pingback: Kaleidoskop häkeln Oma Decke kostenlose Muster | DIY chrystalkay.wordp ... - Frisuren und Strickmuster
Pingback: Squared Diamond Granny Throw & written pattern - Picgram
Pingback: Squared Diamond Granny Throw & written pattern - Teresa Chapman-Stout - Free | sharepin
Pingback: Squared Diamond Granny Throw & schriftliches Muster - Knitting and Crochet
Pingback: Kaleidoscope Crochet Granny Blanket Free Pattern - 1001 Patterns
Pingback: Quadratischer Diamant-Oma-Wurf u. Schriftliches Muster - DIY Knitting
I’ve been trying to find the pattern for the granny square pattern that is done in the purple colours that is shown in the pics I used to finally get to this pattern. Could you please advise what the colours are?
If it is my pattern, I tell you all the colors and how much of each you will need in the beginning of the video. Both right and left handed here:
Right hand: https://www.youtube.com/watch?v=F5NGFWUDI4A&t=1s
Left hand: https://www.youtube.com/watch?v=nPhvcrUGX6c&t=1s
The purple is Amethyst, from Red Heart Super Saver line.
If it was from someone else who used my design then i am afraid I do not know.
Pingback: Squared Diamond Granny Throw – Decorama
Pingback: Kaleidoscope Blanket Free Crochet Patterns | Your Crochet
Pingback: Blanket | Afghan | Throw: Kaleidoscope Blanket Free Crochet Patterns – CrochetAndHandiCraft.com
Making practice piece. This takes determination. Four days of ripping counting and redoing, but guess what. I got it!!!!!!!Proud of myself. Watched Utube on my tv. Much better than using phone
Wonderful! I am so glad you tried it and aced it!
Pingback: Squared Diamond Granny Throw Crochet – My Patterns Free
Pingback: Squared Diamond Granny Throw | Craft ideas
Pingback: Squared Diamond Granny | XELLCRAFTS
Thanks so much for sharing. I love this look, pattern works up fairly quick and easy thanks to your well written instructions….I choose grey, white, light pink, hot pink and black for my colors 😊
Oh my! That color combination sounds amazing! That black must really make that hot pink POP! I am thinking the black is next to the hot pink? Is black the border color for each level? Oh I wish I could see it! Thank you for sharing this!
Black is border yes. I switched up and around with other colors. Drop me an email if you want I would love to show you! Barb.stevens12 and it’s Gmail 😎
For thelife of me, I can’t download or print the Kaleidoscope granny square pattern. Can you help me with this?
Thank you,
Lauri
Laura, I didn’t create the Kaleidoscope granny square. It was based on my Squared Diamond Granny throw. And all you have to do with mine,is copy and paste. Hope that helps!
how big a blanket does it make?
Hi Amy! I did not include a guage for the stitches, so depending on how loose or tight you make it, it will be between 36 and 40″.
Pingback: Squared Diamond Granny Throw Crochet - Only Crochet Free
Pingback: Squared Diamond Granny Throw Crochet Free Pattern – INEWS60S
Pingback: Squared Diamond Granny Throw Crochet Free Pattern – TruenewsK
Pingback: Squared Diamond Granny Throw Crochet Free Pattern – TRUENEWSL
Pingback: Squared Diamond Granny Throw Crochet Free Pattern – TruenewsK
Pingback: Squared Diamond Granny Throw – Crochet Easy Patterns
Pingback: Squared Diamond Granny Throw Crochet Free Pattern – Trendnewzd
Pingback: Slightly Different Granny Free Crochet Patterns
Pingback: Slightly Different Granny Free Crochet Patterns – Daily24trend
Pingback: Crochet Squared Diamond Granny Throw - Insta Crochet
Can this pattern be printed?
You are welcome to copy if you wish to. Just copy and past the whole thing and print it to your heart’s content. Glad you like it.
Is it possible to make this for a twin size bed?
Hi Anne, Sure, you can do it a couple of ways… One is to make it to the width of the bed and add a header and footer to it. Another is to make 2 and connect them along one side the put a border around the two of them. Or you can make smaller ones and use them as large squares to make any size blanket you need. You can use less layers or use the smallest hook you are comfortable with and see what size you come up with. (for experiments, I would use all one color so you can see where the size is going without having to rip out many small pieces) I always keep a couple skeins of yarn that do not go with any project just for trying different stitch combinations and for sizing patterns.
Good luck and enjoy the trip. It is your creative effort that will make this your own pattern!
Pingback: Squared Diamond Granny Throw Crochet Free Pattern |
Pingback: Crochet Squared Diamond Granny Throw... - Insta Crochet
I love this pattern. I would like to make this as a cover for a twin bed. Can you help me with how to adjust the pattern in order to make it more rectangular for the twin bed size?
Okay, I have just spent the last 2 hours with graph paper, trying out different ways to get a square into a rectangle. One, as said above in my last answer, make one square and add a topper and base to elongate it. Second, make 2 connected on one side then make wider side borders to bulk it out to twin width. Third make 6 smaller ones and connect them 2 x 3 into a rectangle. Everything else is more a geometric exercise than a granny square. Like make on where the corner to corner dimension is almost the width of the twin size you want. Then make chevrons on opposite corners until it is the length you need, and then add the last corners off of the chevrons. And others too hard to explain without diagrams. I really want to help, but there are only so many things you can do with a ‘square’ without loosing the square part of the design.
Is there a basic written pattern for this beautiful blanket. I know how hard it must have been to write and post all this. So, thank you so much for sharing it as a ‘free pattern. Nothing against you but I can’t follow it??? God Bless
I think I have gone as far as possible with this. I don’t know what else to say or show. Could you be more specific on what part of it you are having trouble with? I could try to walk you through it.
Pingback: Squared Diamond Granny Throw Crochet Free Pattern |
Pingback: Squared Diamond Granny Throw Crochet Free Pattern – worldnewscl
Pingback: Squared Diamond Granny Throw Crochet Free Pattern – worldnewscl
Pingback: Squared Diamond Granny Throw Crochet Free Pattern | Truehitnews
Pingback: Squared Diamond Granny Throw Crochet Free Pattern |
Pingback: Squared Diamond Granny Throw Crochet Free Pattern - Newsrank3
Pingback: 11 Modern Granny Square Crochet Baby Blanket Patterns - Ideal Me
Pingback: Crochet Squared Diamond Granny Throw - Pretty Ideas
Pingback: Kaleidoscope Crochet Granny Blanket Free Pattern
Pingback: Squared Diamond Granny Throw Crochet Free Pattern - sntnews3
Pingback: Squared Diamond Granny Throw Crochet Free Pattern - todaynewsfixer
Approximately what size is this finished blanket?
between 39 and 42 inches
Love the pattern but I wish I could download it
Dear daisy, left click you mouse and hold it while pulling down the page. It will darken as you go. When you get down to the end of all the instructions, lift your finger and right click choose copy and then go to whatever place you want to save it and right click again and choose paste. This will work for notebook, one note, or any word program. Note: if you use one note, it will also save the urls as live hyperlinks to get to the videos. Good luck!
–
Hey what the fuck is step 13. That is the most confusing I’ve read in my life. I can’t even being to understand what I’m supposed to do after row 12
Please do not use the ‘F’ word in my blog… Thank you. Now, in the video below, go to 1:38:00 and watch from there. The confusion is all caused by the little extra step to keep the back neat at the 2 slip stitches on either side of the chain 2 at the corners. Corners can be tricky and explaining them even trickier. So sorry for the confusion. https://youtu.be/F5NGFWUDI4A?si=fsvB8UaJWfd20Km3&t=5881
hello,
thank you for your wonderful pattern! May I ask if you have a PDF/ other printable version of it? I’m struggling with reading it on a screen!
hope you’re having a lovely day
Well Jenny, thanks to your question I just learned something new. I highlighted the whole page and right clicked and one of my options was to save it as a PDF. So Now I have a PDF copy. Now I need to know how to send it to you. My e-mail address is chrystalkay@hotmail.com. Send me an e-mail with PDF as the subject. I will add the PDF and hit reply. How does that sound?
Amazing! Thank you so much! ❤️
Sent it back. Let me know that it works. I won’t quit until it does! LOL
It works perfectly! Thank you so much!